You turn the key on an old wind-up toy you found in a drawer or at a flea market, but nothing happens. No walking, no spinning, no joyful motion. Don’t toss it out. Most wind-up toys can be revived with basic tools and a little mechanical know-how. The issue usually lies in the spring, gears, or a simple misalignment, problems you can fix at home.
This guide shows you exactly how to diagnose and repair a non-working wind-up toy, whether it’s a vintage tin robot from the 1950s or a modern plastic animal. You’ll learn how to safely disassemble the toy, identify broken or stuck parts, reattach springs, realign gears, and reassemble everything without damaging delicate components.
Diagnose the Problem Before Opening the Toy
A quick assessment saves time and prevents unnecessary disassembly. Watch and listen carefully when you wind the key to determine what exactly is wrong.
No Movement When Wound
If winding does nothing, the spring may be detached or broken. Check for resistance. If the key turns freely with no tension, that’s a clear sign. Listen closely for a faint click or gear grind, which means some parts are still functional. Also inspect external parts to ensure wheels or limbs aren’t jammed by debris or bent axles.
Winding Feels Loose or Slips
A slipping sensation usually indicates a stripped gear tooth that isn’t catching. The spring may have disengaged from the winding shaft. The clutch mechanism could be worn, which is common in older toys.
Winding Is Too Tight or Impossible
If the key won’t turn, the mechanism may be overwound. Forcing it further can break gears. Rust or dried grease may be seizing internal parts. Sand, lint, or foreign debris could be jamming the gears.
Toy Moves Erratically or Partially
If only one leg moves or motion is jerky, a follower piece or cam is likely misaligned. The drive rod may be bent or disconnected. Gears could be partially meshed.
Grinding or Clicking Noises
Unusual sounds point to damaged gear teeth grinding against each other. A loose component may be rattling inside the casing. The spring might be rubbing against the housing.
Gather the Right Tools for the Job
Using proper tools prevents stripping screws or breaking plastic. Having the right equipment makes the difference between a successful repair and a broken toy.
Essential Repair Tools
You need a small Phillips screwdriver that fits most toy screws. A precision flathead or plastic pry tool helps open casings without damage. Needle-nose pliers grip tiny parts. Tweezers handle small gears and springs. Clock oil or synthetic lubricant lubricates gears and pivots. A soft brush and microfiber cloth clean dust and grime.
Make a DIY Screwdriver
No screwdriver? Use a paper clip. Unfold a standard paper clip into a straight wire. Flatten one end with a hammer on a hard surface. Tape the flattened tip to a pen for a handle. Use it on small screws. It works in a pinch.
Open the Toy Safely
Disassembly must be gentle, especially on vintage models. Rushing causes cracks in brittle plastic or thin tin.
Find Hidden Screws
Many screws are hidden under wheels. Press or slide them off to access them. Check beneath bumpers or caps and gently pry with a flat tool. Examine inside the base. Check all sides before prying apart halves.
Separate the Casing
Insert a butter knife or plastic tool into the seam. Apply even pressure around the edges. Work slowly. Don’t crack brittle plastic or thin tin. If the halves are glued, soak in warm (not hot) water for 5 to 10 minutes to soften adhesive. Dry thoroughly before reassembly.
Fix a Broken or Disconnected Spring
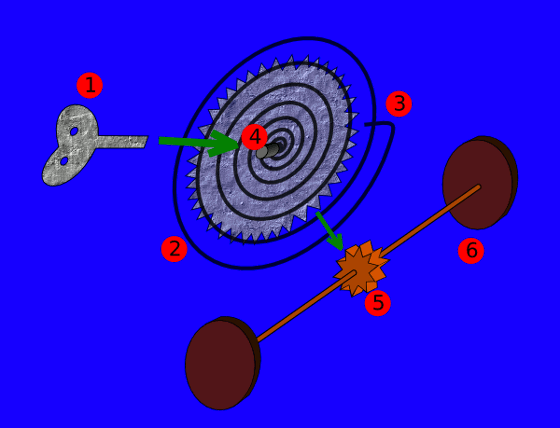
The main spring is the heart of the toy. If it’s loose, the toy won’t work.
Signs of Spring Failure
Watch for no resistance when winding. A sudden stop during operation is a warning sign. Look for a visible gap between the spring and shaft.
Reattach the Spring
Locate the anchor point, a small hook or post inside the casing. Find the spring’s curved end that hooks onto the shaft. Wrap the inner coil around the shaft’s side railings. Press the outer edge against the shaft’s bend. Hold the gearbox steady and turn the winding key slightly. Listen for a click, which means the catch has engaged.
Repair or Replace Damaged Gears
Gears transfer power from the spring to moving parts. If one is broken, motion stops entirely.
Identify Gear Issues
Look for missing or chipped teeth. Check if gears spin freely without driving others. Watch for misalignment where gears aren’t meshing properly.
Realign Gears
Use tweezers or a screwdriver tip to nudge gears into place. Ensure each gear meshes snugly with its neighbor. Test by turning the output axle with your fingers.
Replace Stripped Gears
Source replacements from antique toy shops or online marketplaces like eBay or Etsy. You can 3D print a custom gear if you know the tooth count and size. Use a donor toy of the same model.
Handle an Overwound Toy

Overwinding is often misunderstood. Understanding what actually happens prevents further damage.
What Really Happens
The spring cannot truly be overwound because it has a mechanical stop. Damage occurs when users force the key after feeling resistance. The result is stripped gears or broken clutch teeth.
What to Do
Stop winding when resistance increases. Do not reverse-wind to release tension. This won’t help and may damage gears. If seized, apply one drop of clock oil to gear joints. Wait 24 hours. Try winding gently again.
Lubricate the Mechanism Properly
Dry gears cause friction and wear. Using the right lubricant makes all the difference.
Safe Lubricants
Clock oil, such as Moebius or Nye, is best for precision. Synthetic machine oil lasts long and doesn’t gum up. Apply light oil on a toothpick for precise application.
Avoid These
WD-40 dries out and attracts dust. Cooking oil turns sticky over time. Alcohol damages plastic and paint.
How to Apply
Use a toothpick or syringe. Add one drop to each gear pivot and spring contact point. Wipe away excess with a lint-free cloth. Let sit 10 minutes before testing.
Reassemble in the Right Order
Wrong assembly equals a broken toy. Follow these steps carefully.
Step-by-Step Reassembly
Reinstall the gearbox by aligning casing halves. Slide the crank gear over the spring shaft. Twist slightly to seat it in the middle slot. Insert rods and gears. Slide the drive rod into place. Snap the top piece onto the rod. Position the small gear using tweezers. Ensure it meshes. Secure the spring by winding the key slightly to pull the coil inward. Confirm the bent end catches on the shaft. Thread the shaft through the top hole, then the side hole. Ensure the elongated side faces outward to drive leg movement. Attach the spring to the hook by positioning the rod first. Place the spring onto the hook. Hold the rod against the gearbox to prevent escape. Install the final components. Snap the end piece onto the shaft. It should click. Tighten the last screw with a Phillips driver. Reattach wheels, head, and limbs in reverse order of removal.
Test the Toy Safely
After reassembly, test carefully to ensure everything works.
First Wind Test
Wind only 2 to 3 full turns. Watch for smooth motion. If legs don’t move, try a few more winds. The mechanism may need settling.
What to Check
Check for smooth winding with no grinding or slipping. Ensure even movement where both legs or arms move together. Verify full range of motion with no sticking or jerking.
Special Care for Antique Toys
Vintage wind-ups need extra caution due to their age and collectible value.
Preserve Originality
Only disassemble if necessary. Keep original screws, gears, and paint. Avoid glue or modern parts unless critical.
Clean Gently
Dust tin litho with a soft brush. Dab stains with damp cotton. Use rust remover made for collectibles on pressed steel. Wipe early plastics with mild soap. Keep labels dry.
Store Correctly
Maintain temperature between 60 and 75 degrees Fahrenheit. Keep humidity around 50 percent. Use UV-filtered or LED lighting. Display on felt-lined shelves. Handle with cotton gloves.
When to Call a Professional
Some repairs are beyond DIY. Know your limits.
DIY-Friendly Fixes
You can handle loose screws, reattaching wheels or knobs, light cleaning, replacing missing keys, and simple gear alignment.
Seek Expert Help For
Professional help is needed for internal gear replacement, spring rewinding or realignment, severe rust or corrosion, fabricating missing parts, and high-value antique restoration.
Find Replacement Parts
Need a new key, wheel, or gear? Several sources have what you need.
Where to Buy
Antique toy shops carry vintage-compatible parts. eBay and Etsy let you search by brand and model. Collector forums often have members selling spare parts. Restoration specialists can custom fabricate missing components.
Common Replacements
Wind-up keys come in multiple sizes. Ensure a snug fit. Wheels and bumpers have reproduction parts available. Gears and springs are stocked by specialty suppliers.
Frequently Asked Questions About Fixing Wind-Up Toys
Why won’t my wind-up toy move after winding it?
The most common cause is a detached or broken spring. If the key turns freely with no resistance, the spring has likely come loose from its anchor point. Other possibilities include stripped gears, jammed mechanism, or dried lubricant seizing internal parts.
Can I fix a wind-up toy without opening it?
Minor issues like stuck wheels or loose knobs can sometimes be fixed externally. However, most mechanical problems require opening the casing to access the spring and gears. Always diagnose the problem first to avoid unnecessary disassembly.
What oil is safe for wind-up toys?
Use only clock oil or synthetic machine oil. Apply one drop to each gear pivot using a toothpick. Avoid WD-40, cooking oil, and alcohol, as these damage plastic components and attract dirt.
How do I know if my toy is overwound?
If the key won’t turn or feels extremely tight, stop immediately. Forcing it can strip gears or break the clutch. Apply clock oil and wait 24 hours before attempting to wind gently again.
Are antique wind-up toys worth more if left broken?
Generally, collectors value original, unrestored parts. Only repair if necessary for functionality. On valuable antiques, consider consulting a professional restorer who can preserve collectible value while restoring function.
Where can I find replacement parts for vintage wind-up toys?
Search antique toy shops, eBay, and Etsy for specific brands and models. Collector forums are excellent resources. Restoration specialists can fabricate custom parts when originals aren’t available.
Key Takeaways for Fixing Your Wind-Up Toy
Fixing a wind-up toy blends patience with practical mechanics. Most issues stem from simple causes: loose springs, misaligned gears, or dried lubricant. Always diagnose the problem before opening the toy to avoid unnecessary disassembly. Use proper tools and gentle pressure to avoid damaging fragile components.
The spring is the heart of the mechanism. Reattaching it correctly is the most critical step. Work upside down if needed to prevent the spring from flying out. Apply clock oil sparingly to gears and pivots, avoiding household oils that attract dirt.
Test with partial winds first. Some toys need a few cycles to run smoothly after repair. For valuable antiques, consider professional restoration to preserve collectible value. With the right approach, you can restore motion and preserve a piece of mechanical history. Whether it’s for play, display, or nostalgia, a repaired wind-up toy is more than a fix. It’s a revival of charm, craftsmanship, and childhood wonder.