Imagine watching your child’s eyes light up as they step into a home they helped build, crafted from cardboard, imagination, and shared moments. Building a toy house with cardboard is more than a craft project; it is a gateway to creative play, hands-on learning, and sustainable fun. Whether you are repurposing delivery boxes or designing a themed dollhouse for Playmobil figures, this guide walks you through every step, from planning to playing. You will learn how to turn an ordinary box into a durable, imaginative space with rooms, furniture, and personality using only simple tools and recycled materials.
Choose the Right Cardboard Box
Select a large, clean cardboard box from an appliance, mattress, or moving supply. The size depends on your goal. A doll-sized house around 18″ x 18″ x 24″ fits small figures, while a child-sized playhouse should be 36″ or taller so kids can sit inside. Ensure the cardboard is not crushed, wet, or stained. Double-walled boxes offer better support for multi-floor designs.
Decide on orientation and access based on how your child will play. Front-opening houses allow easy access for small hands and toys. Side-opening adds depth but limits access. Fully enclosed designs work best for display models rather than active play. Use painter’s tape to mark cut lines before slicing to prevent tearing and achieve cleaner edges.
Design the Layout and Build the Structure

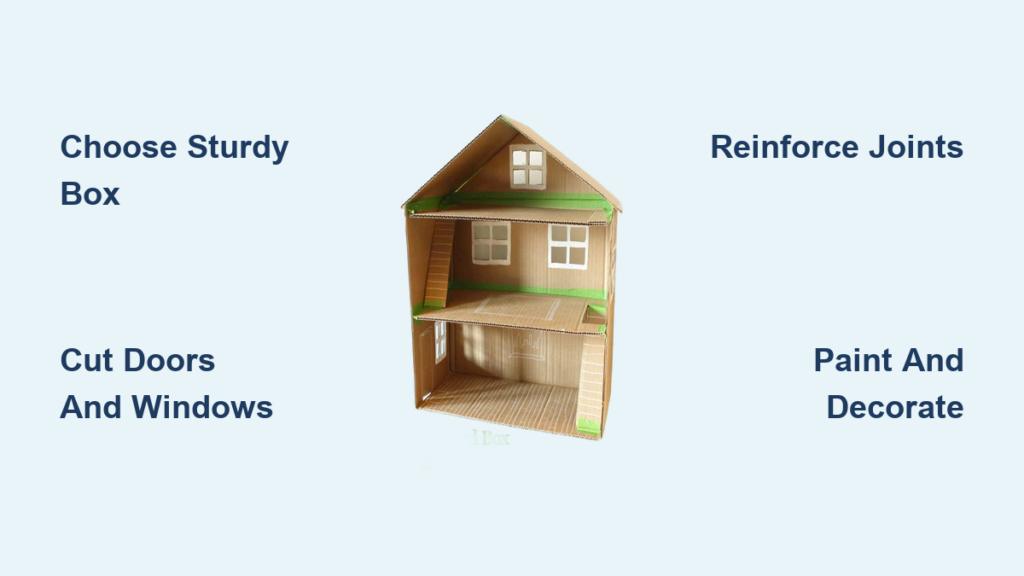
Sketch a simple floor plan before cutting. A two-story house might include a living room and kitchen on the ground floor, a bedroom and bathroom upstairs, and an attic for hidden play space. Divide interior space with vertical walls made from smaller cardboard scraps. Use slot-and-tab joints where you cut halfway slits in each wall and slide them together before gluing for added strength.
Install horizontal floors by cutting cardboard pieces to span the interior width. Glue floor supports to side walls first, then attach the floor panel. Reinforce weak areas underneath with popsicle sticks or coffee stirrers to prevent sagging. For multi-level builds, glue wooden skewers or craft sticks under each floor edge to distribute weight evenly and prevent warping.
Create a peaked roof by cutting a triangle into the top of the front or back wall to form a gable. Use a ruler to ensure symmetry by drawing a center line and marking peak height. Cut two matching roof panels and glue them to the gable and side walls with slight overhang for a realistic look. Hot glue provides quick setting and strong hold. Add a chimney from a rolled tube or small box for extra detail.
Cut Doors and Windows
Make functional hinged doors by drawing a rectangle where the door should go. Cut three sides completely with an X-Acto knife, then score the fourth side lightly to create a hinge. Fold inward for a swinging door. Add a bead or wire handle by wrapping thin wire around a bead and gluing one end to the door. Score gently, as cutting too deep breaks the hinge while cutting too shallow prevents bending.
Frame realistic windows by cutting rectangular openings in exterior walls. Paint frames with acrylics and add grids using a black paint pen. Glue clear plastic from packaging behind openings for a glass effect. As a time-saving shortcut, print window templates on paper and glue them directly to the wall instead of cutting.
Paint and Decorate the Exterior
Apply a base coat of white or light gray paint to the entire house before adding details. Acrylic paint works best because it dries quickly and adheres well to cardboard. Let the base coat dry completely before layering colors.
Add character with details using paint pens or markers to draw shutters, door knockers, brick or siding texture, and house numbers. Let children design their own mailbox or garden using colored paper and markers. This personalizes the house and increases their investment in playing with it.
Finish Interior Walls and Floors
Cover interior walls with recycled paper such as old wrapping paper, fabric scraps, or magazine pages. Cut pieces to size and glue smoothly, avoiding bubbles. Overlap seams slightly for a polished look. Laminate prints of children’s drawings and glue them as wall art for a personal touch that makes the house truly special.
Create realistic wood floors using flooring brochures, printed wood-grain paper, or colored cardstock. Lay strips side by side and stagger seams like real hardwood. Seal with Mod Podge for durability. Patchwork flooring made from mismatched papers adds charm and hides imperfections beautifully.
Add Balconies and Porches
Build a simple balcony by cutting three vertical slats and slotting horizontal pieces between them for railings. Glue onto the second-floor wall and reinforce with a base plate. Paint white or a wood tone to match your design. Add a tiny rug or chair to make the balcony feel lived-in.
Decorate with paper flowers by cutting tissue paper into small circles, layering them, and gluing to a wire stem. Place in tiny pots made from bottle caps. These simple additions transform a plain wall into an inviting outdoor space.
Craft Miniature Furniture and Accessories
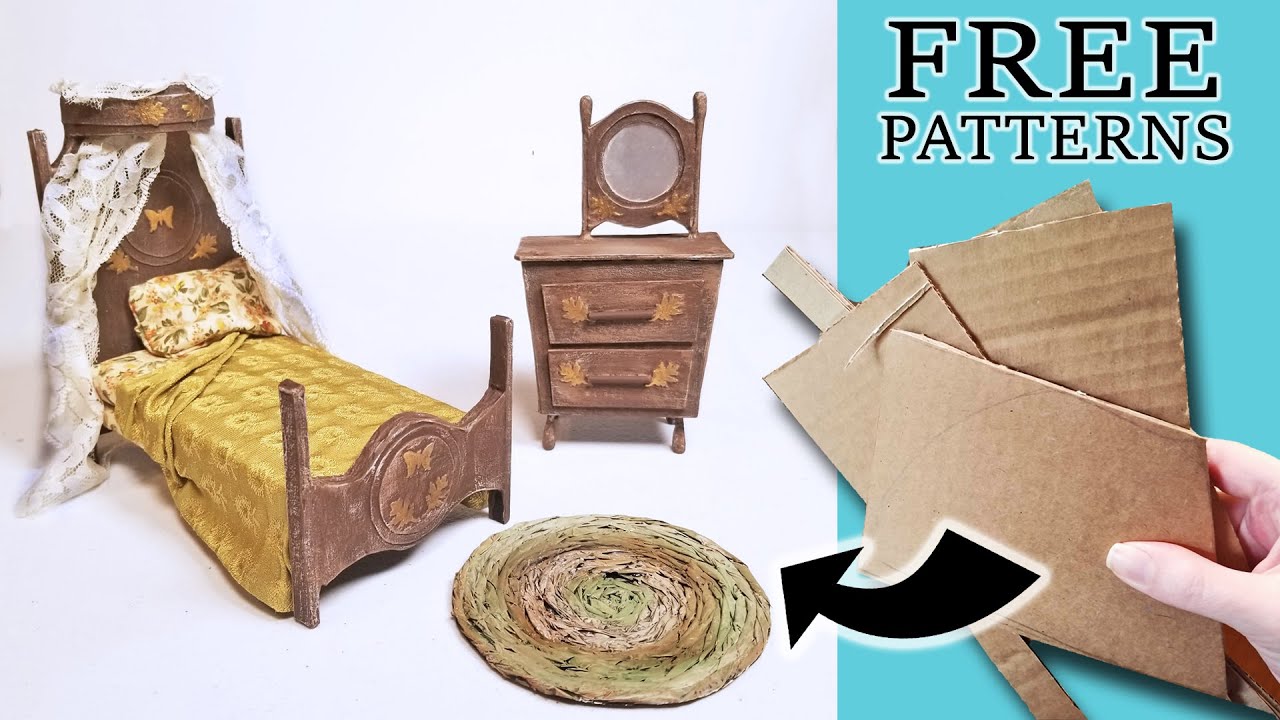
Make essential rooms functional using small boxes and scraps. A kitchen sink can come from an old phone box, a bathtub from a box lid, and a bed from folded cardboard with a fabric pillow. Cut table and chair legs from thin cardboard and fold at 90-degree angles. Search online for free templates for precise shapes.
Add soft furnishings using fabric scraps for rugs from old shirts or skirts, duvets and pillows sewn or glued together, and towels cut from strips of white fabric. Stock the kitchen and bath with bottle caps or foam circles for crockery, a small box with a lid for a toilet, and magazine cutouts for radiators or lamps. Hang mini versions of famous paintings or family portraits mounted on cardstock to make the space feel like a real home.
Reinforce for Durability
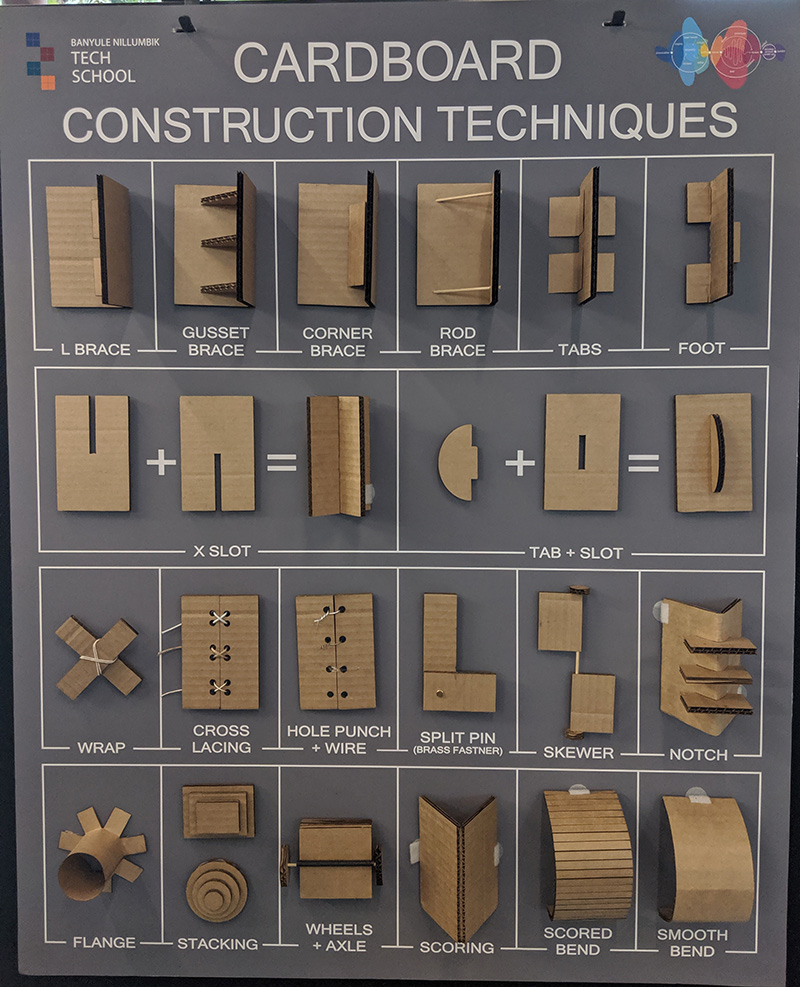
Strengthen high-traffic areas by gluing extra cardboard layers at floor joints, door hinges, and corner edges. Seal painted surfaces with a light coat of clear acrylic spray or Mod Podge to resist wear during active play. Cardboard’s charm lies in its fixability, so repair damage easily by taping cracks from behind, re-gluing loose parts, and redecorating worn spots. Unlike plastic toys, a damaged cardboard house becomes a new project rather than trash.
Customize with Themes
Turn the house into a fire station by painting it red, adding a paper cone siren, and stocking it with toy trucks. Label doors with station numbers for an authentic feel. Build a fantasy castle by adding turrets made from rolled cones, flags on toothpicks, and a drawbridge from hinged cardboard.
Design a modern loft using clean lines, neutral tones, and an open-plan layout without internal walls. Let children vote on the theme to increase their ownership and playtime engagement.
Involve Kids in Every Step
Assign age-appropriate tasks to involve children in the building process. Ages 3 to 5 can handle painting, gluing paper, and placing stickers. Ages 6 to 8 can cut with safety scissors and design rooms. Ages 9 and up can measure and assemble furniture. This builds fine motor skills, spatial reasoning, and confidence while creating shared memories.
Leave room for imagination by not finishing every detail. Let children decide what the attic is for, who lives in the house, and what color the pet is. One creator noted, “Is it perfect? Definitely not! And that is ok!” Imperfection adds character and invites creative storytelling.
Store or Expand Over Time
Fold the house flat for storage by removing furniture and laying it on its side. Cover with a sheet to protect from dust. Some designs allow disassembly using tape instead of permanent glue at key joints. Add features gradually over time, such as LED tea lights for lighting, small wired circuits for advanced users, or new furniture sets built each weekend.
Cost Comparison and Sustainability Benefits
Store-bought dollhouses cost $80 to $300 or more. A cardboard version uses free materials from recycled boxes and basic supplies totaling less than $20. Even with new paint and glue, spending stays under $15. Downloadable PDF plans from Etsy range from $5 to $15 for precise, repeatable builds.
Teach children upcycling by showing them how trash becomes treasure, such as transforming a TV box into a home or reusing old paper for wallpaper. This builds eco-awareness early. Cardboard replaces single-use plastic sets and can be composted or recycled when it wears out, making this project a sustainability win.
Frequently Asked Questions About Making a Toy House with Cardboard
What type of cardboard is best for a toy house?
Use a clean, sturdy box like an appliance or moving box. Double-walled cardboard offers better support for multi-floor designs. Avoid boxes that are crushed, wet, or stained.
How do I make doors that actually open?
Draw a rectangle for the door, cut three sides completely, and score the fourth side lightly to create a hinge. Fold inward to open. Add a small bead or wire handle for a functional doorknob.
Can I make the house waterproof?
Cardboard is not waterproof, but you can seal painted surfaces with a light coat of clear acrylic spray or Mod Podge. Avoid placing the house near water or in humid areas.
How do I attach wallpaper without bubbles?
Cut wallpaper pieces slightly larger than needed, apply glue smoothly, and press from the center outward toward the edges. Overlap seams slightly for a clean finish.
What materials can I use for furniture?
Use small cardboard boxes for sinks and bathtubs, folded cardboard for beds and tables, and fabric scraps for soft furnishings. Bottle caps work well for dishes, and magazine cutouts create artwork.
How do I make the house last longer?
Reinforce high-stress areas with extra cardboard layers at joints and floor supports. Seal painted surfaces and repair damage promptly using tape and glue. Store flat when not in use.
Key Takeaways for Building Your Cardboard Toy House
Building a toy house with cardboard is about connection, not perfection. The laughter during painting, the pride in a wobbly chair, and the stories that unfold inside its handmade walls create lasting memories. Start with a sturdy box, plan your layout, and use slot construction for strength. Involve children in age-appropriate tasks, embrace imperfections, and add details gradually over time. With minimal cost and maximum heart, you create more than a toy. You build a space where imagination lives. Grab a box, call your child over, and start cutting. The house may be cardboard, but the memories are forever.