Dead batteries, silent ignitions, or vehicles that simply refuse to start are incredibly common problems with toy Jeeps. Thousands of ride-on vehicles end up discarded each year, often with only simple electrical issues that cost less than $60 to fix. This toy jeep repair guide walks you through diagnosing the exact cause of failure, replacing faulty components, and even upgrading your Jeep for better speed and control. Whether you found a free project or need to restore your child’s favorite ride, you’ll learn exactly what to test, what to replace, and how to get that toy running again.
Test the Battery First

A dead or dying battery is the number one reason a toy Jeep won’t start. Before touching any wiring or motors, verify the power source is actually working.
Check Voltage with a Multimeter
Set your multimeter to DC volts and touch the red probe to the positive terminal and black to the negative. For a 12V system, the readings tell the whole story.
Expected readings:
• 12.6V to 12.9V means the battery is fully charged
• Below 10V indicates the battery is dead and likely unrecoverable
• A reading between 10V and 12V means the battery needs charging but may still be usable
If voltage reads low, connect the charger. However, don’t assume the charger is working just because it’s plugged in. Move to the next step if the Jeep still won’t power on after charging or replacing the battery.
Replace with a Compatible Battery Pack
A standard 12V replacement battery costs approximately $20 and comes in 12Ah to 14Ah capacities. Ensure the voltage matches your model exactly. Secure the battery with straps or foam padding to prevent vibration damage during use.
Warning: Never mix old and new batteries in a series configuration. Mismatched cells cause imbalances that reduce lifespan and can damage other components.
Inspect the Charging Port

Moisture and corrosion create a sneaky problem that tricks the controller into thinking the charger is always plugged in. This blocks motor activation even when the battery is perfectly fine.
Diagnose False Charger Signals
Unplug the charger and measure the middle pin of the charging port with your multimeter. It should read 0V when idle. If it shows 0.8V or higher, the controller believes a charger is connected and disables operation. This is one of the most overlooked issues in toy jeep repair.
Replace the Charging Connector
A new charging connector costs about $10. Wire it correctly: red goes to 12V power, black goes to ground, and the middle wire carries the signal and must read 0V when unplugged. Solder all connections and insulate with heat shrink tubing. Seal the port if the Jeep is used outdoors to prevent future moisture damage.
Expert Note: This issue fixes approximately 30% of “no power” cases even after battery replacement.
Test the Ignition Switch
Many toy Jeeps have two separate switches: a main power button and a key-style ignition. The ignition switch commonly fails due to internal breaks in the wiring.
Use a Multimeter for Continuity
Disconnect the battery first for safety. Remove the wires from the ignition switch, typically red and white. Set your multimeter to continuity mode, insert the key, and turn it to “on.” No beep or reading means the switch is dead.
Bypass Temporarily to Confirm
With the battery still disconnected, short the red and white wires together using a jumper wire or paperclip. Reconnect the battery. If the Jeep powers on, the ignition switch must be replaced. A replacement costs approximately $7.
Safety First: Only bypass during testing. Always install a working switch before regular use.
Evaluate the Controller Box
The controller manages pedal input, direction, lights, and sound. If the battery, charging port, and ignition switch all check out but nothing works, the controller is likely the culprit.
Install a New Controller
A new controller costs approximately $20 and often includes a remote control feature. Look for models with 2.4GHz remote capability for parent override, overcurrent protection, and forward/reverse support. Match the wire connections carefully.
Standard wiring:
• B+ connects to battery positive
• GND connects to ground
• FL/FR connect to front left/right motors
• RL/RR connect to rear left/right motors
• ACC connects to accessories like lights and horn
Verify Wiring Color Codes
Manufacturers use different color schemes, so always double-check. Red typically indicates power, black indicates ground, green or yellow indicates motor leads, and blue or white indicates pedal or switch connections. Use electrical tape or wire markers to avoid mistakes during installation.
Pro Tip: Upgrade to a remote-enabled controller even if you don’t need it immediately. It adds safety features and increases resale value.
Check the Forward-Reverse Shifter
If the Jeep only moves in one direction or refuses to move at all, the shifter or its connection is likely faulty.
Test with a Multimeter
Set your multimeter to continuity mode. Move the shifter between positions and check for signal changes across the terminals. No change indicates the switch is broken.
Replace with Dashboard Rocker Switch
Install a 3-position forward-off-reverse rocker switch on the dashboard. Wire it to reverse polarity: when in forward mode, positive voltage goes to motor positive and motor negative goes to ground. In reverse mode, the polarity flips. This changes the motor direction without requiring complex electronics.
Upgrade Battery for More Power
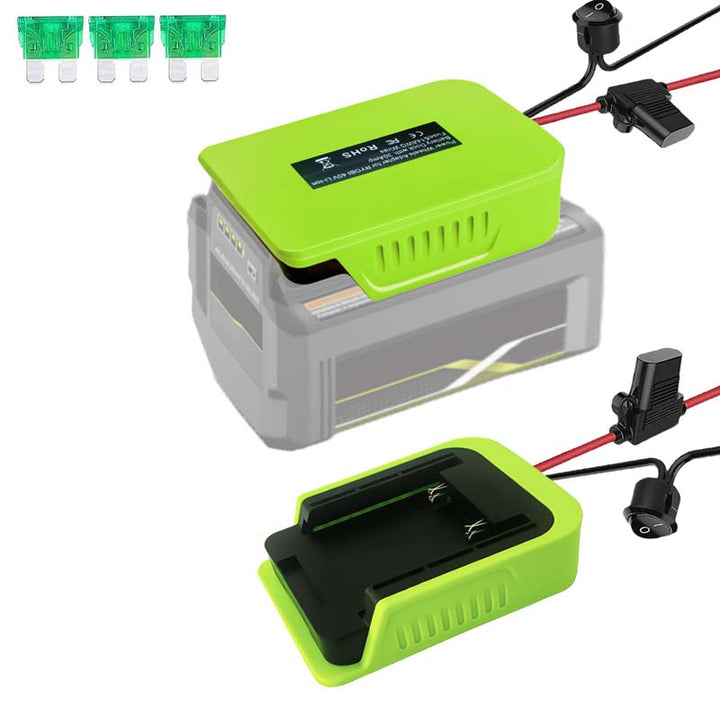
Standard toy Jeeps run on 12V, but upgrading dramatically improves performance. Many enthusiasts upgrade to 36V or 40V systems for better speed and torque.
Series Connection for Higher Voltage
Two 20V Ryobi battery packs connected in series create a 40V system with 14Ah capacity. This doubles the original amp-hour rating and significantly boosts runtime and power. Ryobi packs are preferred because they tolerate deep discharge better than DeWalt packs, which require external protection modules.
Add Variable Speed Control
Retain the original pedal as your input device but add an adjustable voltage-limiting dial. This caps the maximum output to the motor and enables smooth acceleration. It prevents sudden jerks or wheel spin and mimics real vehicle control.
Safety Modifications for Kids

When upgrading performance, safety becomes even more important. Add these features to protect younger riders.
Essential Safety Additions
• Install seatbelts to keep occupants secure
• Add high-side walls to prevent falls during motion
• Include a steering servo for remote-assisted steering
• Use automatic-reset circuit breakers instead of fuses for easier troubleshooting
Pro Tip: Some gearboxes include a screw limiter that caps top speed. Removing it increases performance, but only do this if you’ve upgraded the motor and controller to handle the extra power.
Cost Summary of Typical Repairs
Understanding the typical costs helps you budget your toy jeep repair project.
Expected expenses:
• New 12V battery: $20
• Controller with remote: $20
• Charging connector: $10
• Ignition switch replacement: $7
• Forward-reverse switch: $10 to $15
• Total estimated cost: approximately $57
Reusing intact parts like wheels, body panels, and wiring keeps costs low. Upgraded systems with 40V batteries cost more but offer significantly better performance.
Frequently Asked Questions About Toy Jeep Repair
Why does my toy Jeep won’t start even after replacing the battery?
The problem likely isn’t the battery. Check the charging port for corrosion or false signals. A damaged port can trick the controller into thinking a charger is connected, which disables motor operation. Measure the middle pin of the charging port; it should read 0V when idle.
Can I upgrade my 12V toy Jeep to 24V or 40V?
Yes, you can upgrade voltage, but you must also upgrade the controller and motor to handle the extra power. Running higher voltage through stock components will burn out the motor. Use a controller rated for your new voltage and ensure the motor can handle the increase.
How do I know if the motor is burnt out?
A burnt motor often smells like burning plastic or won’t spin freely when manually turned. Check for unusual noises during operation and listen for overheating. If the motor stalls frequently or runs hotter than normal, inspect the commutator and brushes.
Is toy jeep repair safe for children to help with?
Basic tasks like cleaning or checking connections can involve children, but all electrical work should be done by adults. Always disconnect the battery before working on wiring. Once repairs are complete and tested, children can help with final assembly and testing under supervision.
What’s the most common failure in toy Jeeps?
Dead batteries are the most common issue, followed by faulty charging ports and failed ignition switches. These three components account for the majority of “no power” problems and are the first things to check during diagnosis.
Key Takeaways for Successful Toy Jeep Repair
Toy jeep repair is straightforward when you follow a systematic approach. Start by testing the battery, then move to the charging port, ignition switch, and finally the controller. This diagnostic order saves time by isolating the most common failures first.
Most non-starting issues cost less than $60 to fix and require only basic tools like a multimeter. The majority of problems stem from dead batteries, corroded charging ports, or failed switches, not from motors or complex electronics. Upgrading to higher voltage systems like 40V using Ryobi batteries dramatically improves speed and runtime, while added safety features like remote controls and seatbelts make the vehicle safer for younger children.
With proper diagnosis and quality replacement parts, you can transform a discarded ride-on into a high-performance vehicle that provides years of enjoyment. Start with the battery test, work through each component systematically, and don’t skip the safety upgrades if children will be riding.