You’ve seen them in nurseries and craft rooms, those charming triangular nets holding stuffed animals or yarn skeins like handmade cradles. If you’ve ever wanted to learn how to crochet a toy net, you’re in the right place. This beginner-friendly project combines function and charm, creating a durable storage solution that doubles as wall decor. Using basic stitches and a few essential tools, you can make a custom-sized toy hammock in a weekend.
Whether you’re organizing toys for a child’s room or storing yarn in your crafting corner, this net grows radially from a central ring into a wide, open mesh. The pattern relies on consistent increases at corners, forming an expanding triangle with breathable chain spaces. You’ll use double crochet, work in joined rounds or continuous rows, and finish with optional fringe for flair. With cotton yarn and the right hook, it’s easy to start and satisfying to complete.
Choose the Right Yarn & Hook for Your Toy Net

Selecting appropriate materials sets you up for success from the beginning. The right yarn and hook combination creates a sturdy net that holds its shape while supporting lightweight items.
Pick a Structured Cotton Yarn
For a sturdy, shape-retaining toy net, choose medium worsted to chunky cotton or cotton-blend yarn. Cotton holds its form better than acrylic, which can stretch over time under the weight of toys or yarn. Recommended options include Lily Sugar’n Cream, Caron Cotton Cakes, or Lion Brand Cottage Cotton, all widely available and durable.
Worsted weight size 4 is ideal for beginners, offering good balance of stitch definition and speed. If you want a faster, chunkier result, go for bulky size 5 to 6 yarn like Bernat Premium. Thicker yarn means fewer rows and a looser, more dramatic drape.
Avoid slippery or overly stretchy fibers. The net needs to support lightweight items without sagging excessively. A cotton blend with 20 to 30 percent acrylic is acceptable for softness, but keep cotton content high for structure.
Match Hook to Yarn Weight
Use a hook size that matches your yarn label’s recommendation, typically 4 mm to 10 mm depending on weight. For worsted cotton, reach for 4 to 5 mm hooks. Use 5.75 to 6 mm for looser drape, and 10 mm for bulky yarn.
A larger hook creates more open mesh and faster growth, while a smaller hook yields a tighter, stiffer net. Hold the hook like a pencil, using your index finger to guide it. This improves control and keeps tension even throughout your project.
Gather Essential Tools
In addition to yarn and hook, you’ll need a few basic supplies. A tapestry needle serves for weaving in ends and attaching fringe. Scissors make cutting yarn easy and clean. Stitch markers, though optional, help mark corner chain spaces. A measuring tape lets you track width as you work.
Keep these tools handy before starting your project. Having everything within reach ensures smooth progress and prevents interruptions that can disrupt your rhythm.
Start with a Magic Ring Foundation
The magic ring serves as the adjustable center of your toy net. This technique creates a tight, closed circle that becomes the back corner of your finished hammock.
Form the Adjustable Center
To make a magic ring, wrap yarn around your index and middle fingers, crossing to form an X. Insert hook under the lower loop, yarn over, and pull up a loop. Chain 2 for double crochet or chain 4 for treble, then work your first stitches into the ring. After completing the round, pull the tail to close the hole snugly.
This ring anchors the radial growth of your net. If you’re uncomfortable with the magic ring, a slip knot plus chain 4 loop works in a pinch, but may leave a small hole in the center.
Begin the First Round
Most patterns start with 3 double crochet, chain 2, repeated three times in the ring. This creates four clusters separated by chain spaces, your first corner points.
For double crochet, chain 2 to count as first double crochet. Work 3 double crochet, chain 2, three more times in the ring. Join to the top of the first double crochet with a slip stitch.
If using treble crochet, chain 4 to count as first treble, then work 3 treble into the ring, chain 3, and repeat. Pull the ring tight and chain 4 to turn.
This initial round sets the triangular foundation. The chain 2 or chain 3 spaces become your corner markers in the next round.
Build the Triangle with Consistent Increases
The key to expanding your toy net lies in increasing at corners only. This technique maintains the triangular shape while creating the open mesh that makes the net functional.
Expand Using Joined Rounds
In joined round methods, turn your work and slip stitch into the next chain 2 space. Chain 2, then 3 double crochet in the same space. Chain 1, then 3 double crochet in each side chain 1 space. At the corner, work 3 double crochet, chain 2, 3 double crochet into the chain 2 gap. Repeat for all three sides and join with slip stitch to first double crochet.
Each side gains one more 3 double crochet group per round, while chain 1 spaces separate clusters along the edges. The chain 2 at corners remains your expansion point throughout the project.
Expand Using Continuous Rows
Some patterns use continuous rows instead of joined rounds. This method creates a right triangle and avoids joining at the end of each round.
After the magic ring, chain 4 to count as double crochet and turn. One double crochet into the same stitch. Chain 2, 1 double crochet into next chain 2 space, repeat across. Finish by working the last double crochet into the second chain of the starting chain 4.
Each row starts with chain 4, turns, and adds one more double crochet chain 2 unit than the last. The number of chain 2 spaces increases by one per row, creating even expansion.
Control the Angle as You Work
Turn your piece on its side every few rounds to check the angle. Aim for a 90-degree corner between the two long sides. If the angle is too wide, your tension may be too loose, so tighten slightly. If too narrow, loosen up.
Use stitch markers to highlight the chain 2 corner spaces until you develop a rhythm. This prevents missed increases and keeps the triangle symmetrical throughout construction.
Customize with Color & Texture

Adding personal flair transforms your toy net from functional to fabulous. Customization options range from simple color changes to decorative embellishments.
Add Stripes or Gradient Effects
Switch colors every few rounds for a striped toy net. Change yarn at the join point after the slip stitch by tying the new color to the old, then pull through. Weave in the ends later using a tapestry needle.
Or use ombre or gradient cake yarn for a seamless color shift. This creates a soft, modern look without managing multiple skeins. Keep color changes simple, sticking to two or three shades for visual clarity. Contrasting colors make the mesh pattern pop.
Embellish with Bobbles or Puffs
For texture, add bobble stitches along the edges. These decorative puffs don’t affect structure but add whimsy to your finished piece.
To make a bobble, insert hook into a stitch, yarn over, pull up a loop. Repeat three more times, keeping five total loops on the hook. Yarn over and pull through all five loops to complete the bobble.
Place bobbles every few stitches, with 2 single crochet before and after to space them evenly. This works best on the finished edge or in the central rows where they won’t interfere with the mesh structure.
Attach Fringe or Tassels
Use leftover yarn to add fringe across the front edge. Cut strands 6 to 8 inches long, fold in half, and pull the loop through a chain 1 space. Pass the ends through the loop and tighten.
For tassels, wrap yarn around a book or ruler 10 times. Cut one end, tie a strand around the top to secure. Pull loop through a chain 1 space, thread ends through, and tighten. Trim the bottom for even length.
Attach fringe in every gap or space them out every few inches. This adds movement and hides the edge beautifully.
Finish with a Clean Border
A finished border stabilizes the net and gives it a polished, professional look. This step reinforces the perimeter and smooths any jagged edges from open chains.
Work a Single Crochet Edge
After the last round, chain 1 and turn. Work single crochet along the outer edge. For 2-chain spaces, place 2 single crochet into each. For larger gaps like chain 4, treat as two spaces, placing 2 single crochet then 1 single crochet in the next stitch.
This edging smooths the look of open chains and reinforces the perimeter. It’s optional but recommended if you plan to hang heavier items or want a cleaner appearance.
Fasten Off Securely
When the net reaches your desired size, typically 40 to 45 inches wide, complete the final round or row. Cut yarn, leaving a 6-inch tail. Yarn over and pull through the last loop to lock it. Use a tapestry needle to weave in the end through the back of several stitches.
Do the same for the starting tail. Go back and forth randomly to secure, but don’t pull too tight or the fabric may pucker. If you added fringe, weave in those ends too.
Hang the Net Securely
Proper mounting ensures your toy net functions safely and looks its best. Understanding attachment points and hardware options helps you install it correctly.
Identify the Three Anchor Points
Your toy net has three natural attachment points. The back corner is the original magic ring. The two front corners are the ends of the final row or round. These form a triangle that distributes weight evenly when hung.
Mark these points clearly before mounting. Use strong mounting hardware to prevent tearing and ensure long-lasting support for your toys or yarn.
Choose Damage-Free or Permanent Hooks
For walls, Command hooks offer removable, paint-safe options. Picture hooks or nails provide more security for long-term use. Thumb tacks or push pins suit lightweight nets. Wall anchors work best for heavy loads or plaster walls.
Always place hardware between strands, not through a single stitch. This prevents stress on individual loops and reduces the risk of tearing.
Mount with a Gentle Slope
Start by attaching the two front corners to the wall at the same height. Then position the back corner 2 to 4 inches higher. This creates a soft dip in the center that cradles toys or yarn.
The slope improves both function and aesthetics. It keeps items from rolling out and adds a cozy, hammock-like curve. Avoid overloading the net with heavy items like books or electronics.
Adjust Size & Style to Fit Your Needs
One of the greatest strengths of the toy net pattern lies in its flexibility. You can scale the project up or down to match your specific requirements.
Scale Up or Down Easily
This pattern has no fixed end point. Stop crocheting when the net reaches your desired width. With worsted yarn, 50 to 60 rows or 40 rounds are typical. Chunky yarn may only need 10 to 18 rows for the same size.
Use a measuring tape every few rounds to monitor progress. Thicker yarn and larger hooks reduce row count significantly, while thinner yarn requires more rows to achieve the same dimensions.
Adapt for Different Uses
This same technique works for yarn storage in craft rooms, toy organizers in nurseries, game accessory holders, or wall decor with tassels and bold colors. One popular designer uses it as a yarn caddy, proving its dual function.
You can even add a fabric liner for extra support if planning to hold heavier items. The basic construction remains the same regardless of intended use.
Maintain and Repair as Needed
Hand wash in cool water with mild soap if needed. Lay flat to dry, never hang wet as it may stretch. Loose stitches can be reworked with a hook, and fringe can be replaced. With proper care, your net can last several years.
Frequently Asked Questions About Crocheting a Toy Net
What type of yarn is best for a toy net?
Cotton or cotton-blend yarn in worsted to chunky weight works best. Cotton holds its shape better than acrylic and provides durability. Lily Sugar’n Cream, Caron Cotton Cakes, and Lion Brand Cottage Cotton are popular choices widely available at craft stores.
How long does it take to crochet a toy net?
For experienced crocheters, plan for 2 to 4 hours. Beginners should expect 5 to 8 hours depending on their skill level and the yarn weight used. Chunky yarn with a large hook significantly reduces completion time.
What size should my toy net be?
A standard finished width of 40 to 45 inches works well for most uses. The exact size depends on your needs and yarn thickness. Stop crocheting when you reach your desired dimensions, as there’s no fixed endpoint.
Can I hang my toy net on any wall?
Yes, but choose appropriate hardware. Command hooks work for temporary or rental situations. Nails or picture hooks suit permanent installations. Always mount between strands rather than through individual stitches to prevent damage.
How do I attach fringe to my toy net?
Cut yarn strands 6 to 8 inches long. Fold each strand in half and pull the loop through a chain space. Pass the cut ends through the loop and tighten. Space fringe every few gaps or in every opening depending on your preference.
Key Takeaways for Crocheting Your Own Toy Net
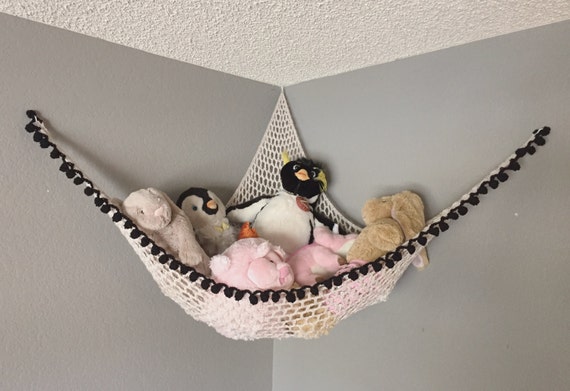
The crocheted toy net is a versatile, beginner-accessible project that blends practicality with handmade charm. Whether you follow a granny-style round pattern or a linear row method, the result is a functional storage solution perfect for playrooms, nurseries, or craft spaces.
Remember to choose cotton yarn for structure, mark your corner chain spaces for symmetry, and mount with a gentle slope for that cozy hammock effect. The pattern scales easily, so stop when you reach your desired size. Add fringe, switch colors, or embellish with bobbles to make it uniquely yours.
Your handmade hammock awaits. Gather your materials, start with a magic ring, and let the triangle grow. You’ll have a beautiful, functional storage net completed in just a few sessions.